Connect to Nebari's JupyterLab via SSH or SFTP
Secure Shell Protocol (SSH) is a standard protocol for communicating securely over a network connection. Secure File Transfer Protocol (SFTP) is based on SSH and transfers files to and from a remote machine. In this guide, you will learn how to connect and launch your JupyterLab user instance via SSH and transfer files using SFTP from your local machine.
Nebari includes a package called jupyterhub-ssh in all deployments to allow remote connection to their user instances. On Nebari, SSH connections are set up on port 8022 and SFTP connections on port 8023.
There is a distinction between the Nebari and JupyterHub servers, though these are easily conflated by end users.
Nebari itself is generally accessed via kubectl
to connect directly to the cluster (nodes or pods), while the JupyterHub server runs on Nebari and controls the spawning of
user instances of JupyterLab. The approach described here uses a JupyterHub plugin, jupyterhub-ssh, to spawn and access users' JupyterLab instance
Prepare for the connection on the Nebari deployment
You will create a JupyterHub token in order to access your server remotely. To do this, log into your Nebari deployment and navigate to the JupyterHub token page, <your-nebari-domain.org/hub/token>.
This page is also accessible via the Nebari Home Page:
- If your deployment has
jhub-appsenabled, you can navigate to this page by selecting theTokenoption under your username in the upper righthand corner. - If your deployment does not have
jhub-appsenabled, you can click on theTokenlink on the top navigation bar.
Fill out the form for token creation:
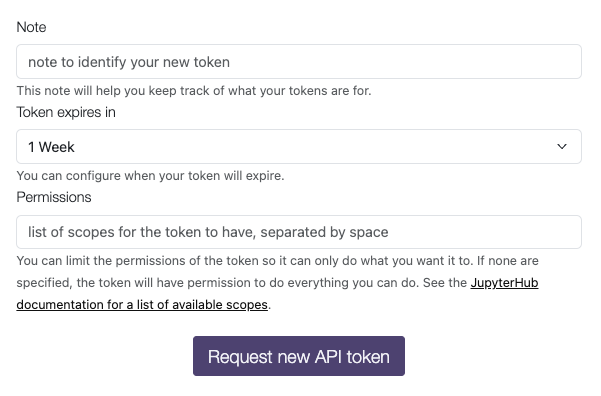
You may add a note and expiration date to the token. You can leave the scopes field blank to give the token all the permissions that your user typically has on JupyterHub (which is the service on which Nebari is running).
Connect to Nebari via SSH
Before you begin, you'll need to have SSH installed on your local machine. From a terminal, use ssh to start the connection.
ssh <your-nebari-domain.com> -l <your-username> -p 8022
The syntax for <your-nebari-domain.com> is important - do not include https:// or a trailing /. If you have the incorrect syntax, it will result in the error:
Could not resolve hostname <your-nebari-domain.com>: nodename nor servname provided, or not known
You will then be prompted for your password. Enter the token as the password and press Enter.
If you don't already have a JupyterLab server running on your Nebari instance, the server may take a few minutes to start up. The ssh connection has its own timeout period, likely shorter than the time it takes to spin up a new server. Therefore, you may see the following error as the ssh connection times out:
Starting your server............................................failed to start server on time!
The good news is that Nebari is still working on spinning up your server. Retry the ssh connection until the connection is established once the server is up and accessible.
Once the connection is complete, you will have terminal access to your JupyterLab instance on Nebari.
Use SFTP to transfer files to/from Nebari
By default, SFTP uses the SSH protocol to authenticate and establish a secure connection. Because of this, the same authentication token used previously in its SSH counterpart can be used here.
Utilizing SFTP will depend on how your local machine is configured and the utility you're using for SFTP. In some cases, your SSH configuration will allow SFTP to work "out of the box". Other times, special SFTP setup is required in your SSH configuration to allow for these connections.
Similar to ssh, from a terminal, use sftp to begin a new connection:
sftp <your-nebari-domain.com> -l <your-username> -p 8023
Transferring Files with SFTP
Downloading Files:
- Use the
getcommand to download files from the remote host:get <remote-file>downloads the file with the same name to the local system.get <remote-file> <local-file>downloads and saves the file with a different name.- To download a directory and its contents, use
get -r <some-directory>. - To maintain permissions and access times, use
get -Pr <some-directory>.
Uploading Files:
- Use the
putcommand to upload files to the remote system:put <local-file>uploads the file.- To upload a directory and its contents, use
put -r <some-directory>.
Dangerous, but useful information
The following suggestion is not recommended unless absolutely necessary since it will artificially keep a JupyterLab instance running which may have financial repercussions.
If you have a long-running task and you need to avoid the idle-culler on JupyterLab, you can use tmux to keep your server alive while your task is completing.
Short list of useful commands:
- Create a new session
tmux new -s mysession - Detach from session ctrl + b d
- List available session
tmux ls - Attach to a session
tmux attach -t mysession